Energy Usage Monitoring & Tracking
Introduction
Section titled “Introduction”Moonraker’s extended data collection capabilities enable seamless integration with additional sensor sources, including power meters. This feature allows for the tracking of energy consumption data within Moonraker’s job history component. Leveraging energy monitors like the Shelly 1PM series, you can gain insights into the energy usage per print job. This guide provides a step-by-step walkthrough for setting up a MQTT server to facilitate data exchange between Shelly and Moonraker, as well as configuring Moonraker to poll and store energy consumption data. Additionally, this guide covers the configuration of Mainsail and Moonraker sensors to track energy usage in the job history.
Prerequisites
Section titled “Prerequisites”- A power meter or sensor capable of publishing measurements to an MQTT server is required. Compatible devices include the Shelly PM series (e.g., Shelly 1PM Pro or Shelly 1PM Mini) and Tasmota-based devices. Please note that device installation is not covered in this guide.
- The power meter must be configured to operate on the same network as the Raspberry Pi that controls your printer to allow communication and data exchange.
- A recent version of Mainsail installation (minimum version 2.12.0) is also required.
MQTT Server
Section titled “MQTT Server”MQTT (Message Queuing Telemetry Transport) is a lightweight, machine-to-machine communication protocol that enables Internet of Things (IoT) components to exchange messages. In this application, the Powermeter utilizes MQTT to periodically publish measurement data, while Moonraker subscribes to these messages to receive the data. To facilitate this communication, we will install an MQTT Server on the Raspberry Pi controlling the 3D printer.
Installation
Section titled “Installation”Please execute the following commands via SSH to complete the installation.
-
Install the necessary software components by running the following command
Installing the Mosquitto server sudo apt install -y mosquitto mosquitto-clients -
Configure the Mosquitto MQTT server to automatically start on system boot
Starting Mosquitto on printer startup sudo systemctl enable mosquitto.service
Configuration
Section titled “Configuration”To enable the MQTT server to receive messages from the power meter over the network, it is essential to configure the server to listen on a designated network port. The subsequent steps will guide you through the setup process for an unauthenticated (anonymous) connection, ensuring seamless communication between the power meter and the MQTT server.
-
Execute the following command to access and modify the configuration file
Editing the configuration file sudo nano /etc/mosquitto/mosquitto.conf -
Append the following configuration settings to the end of the file
mosquitto.conf listener 1883allow_anonymous true -
Exit the editor and save the file by pressing CTRL-X, then confirm with Y and Enter
-
Apply the new configuration by restarting Mosquitto
Restarting the Mosquitto service sudo systemctl restart mosquitto
Power Meter
Section titled “Power Meter”Next, configure the power meter to publish measurements at regular intervals to the MQTT server, enabling data exchange and tracking.
Configuration
Section titled “Configuration”-
Identify the IP address of your Raspberry Pi by executing the following command:
Determining the primary IP address hostname -IThe resulting output should resemble the following:
Output py@voron: $ hostname -I198.51.100.60 198.51.100.61 2600:1700:5430:87af::1106 2001:0db8:5dc9:b0ba:f8a8:7e3c:45e2:faab 2001:0db8:5dc9:b0ba:f8a8:7e3c:45e2:faacTake note of the primary IP address, 198.51.100.60, displayed in the first column of the output. This information is essential for the next steps, so please document it for later use.
-
Open a web browser and enter the IP address of your Shelly device to access its web-based interface and configure settings.
-
Navigate to Settings > MQTT in the Connectivity section.
-
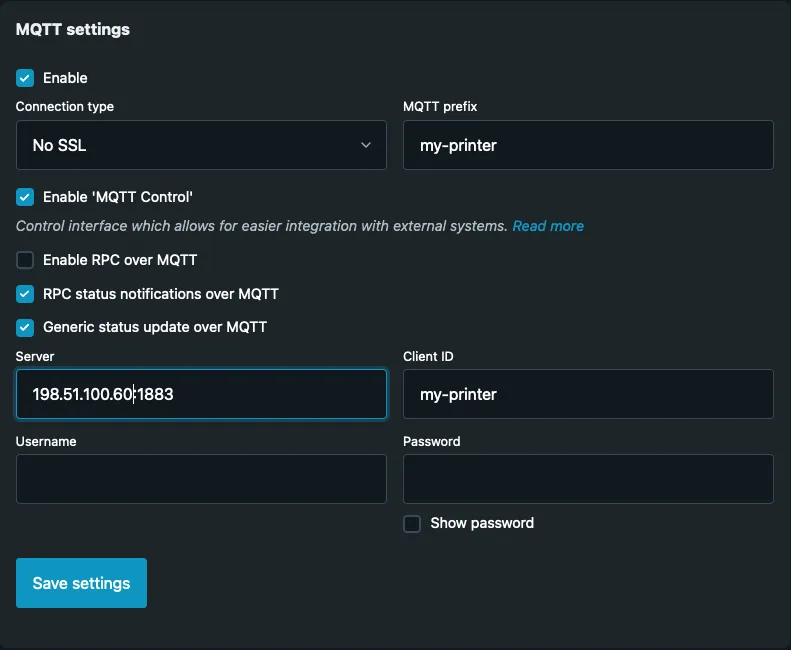
Configure the following settings:
- Enable: Checked
- Connection type: No SSL
- MQTT Prefix: my-printer
- MQTT Control: Enabled
- Generic status update over MQTT: Enabled
- Server: IP address of your Raspberry Pi (determined in step 1), followed by
:1883, for example 198.51.100.60:1883 - Client ID: my-printer
- Username and Password: Leave blank
-
Click Save Settings to apply the changes. A restart of the Shelly might be required.
Moonraker
Section titled “Moonraker”Configure Moonraker to integrate additional sensor sources, enabling real-time data tracking in Mainsail and historical data analysis in the job history.
MQTT Configuration
Section titled “MQTT Configuration”-
Execute the following command to access and modify the configuration file
Editing the Moonraker configuration file sudo nano ~/printer_data/config/moonraker.conf -
Append the following configuration settings to the file to configure Moonraker to receive messages from the MQTT server
moonraker.conf [mqtt]address: 127.0.0.1enable_moonraker_api: False
Sensor Configuration
Section titled “Sensor Configuration”-
Append the following configuration block to establish a sensor that subscribes to MQTT messages from the Shelly 1PM
moonraker.conf [sensor powermeter]type: mqttname: Shelly 1PMparameter_power:units=Wparameter_voltage:units=Vparameter_current:units=Aparameter_energy:units=kWhstate_topic: my-printer/status/switch:0state_response_template:{% set notification = payload|fromjson %}{set_result("power", notification["apower"]|float)}{set_result("voltage", notification["voltage"]|float)}{set_result("current", notification["current"]|float)}{set_result("energy", notification["aenergy"]["total"]|float / 1000)}This configuration enables the extraction of key data points from Shelly 1PM status updates, including:
- Current mains voltage
- Current power draw
- Current power usage
- Total energy consumption (in kilowatt-hours)
-
Apply the new configuration by restarting Moonraker
Restarting the Mooraker service sudo systemctl restart moonraker -
Confirm Data Exchange
To ensure the successful publication of measurements from the power meter and Moonraker’s ability to process them, navigate to the Mainsail Web UI for your printer.
If the integration is functioning correctly, you should observe four new measurements from your sensor in the ‘Miscellaneous Card’ on the dashboard, as depicted in the screenshot below:
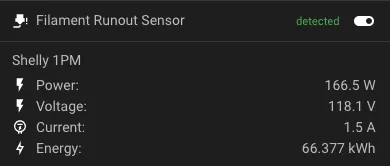
This verification step confirms the accurate exchange of data between the power meter and Moonraker, enabling real-time monitoring and analysis of energy consumption.
Historical Data
Section titled “Historical Data”Moonraker allows tracking auxillary sensor data in the job history. To facilitate persisting this data additional history fields need to be configured for the sensor.
-
Execute the following command to access and modify the Moonraker configuration file
Editing the Moonraker configuration file sudo nano ~/printer_data/config/moonraker.conf -
Enhance sensor definition with history fields
Append the following configuration lines to the previously defined sensor:
moonraker.conf history_field_energy_consumption:parameter=energydesc=Energy consumptionstrategy=deltaunits=kWhinit_tracker=trueprecision=6exclude_paused=falsereport_total=truereport_maximum=truehistory_field_average_power:parameter=powerdesc=Average power drawstrategy=averageunits=Wreport_total=falsereport_maximum=truehistory_field_max_power:parameter=powerdesc=Maximum power drawstrategy=maximumunits=Winit_tracker=truereport_total=falsereport_maximum=falsehistory_field_average_current:parameter=currentdesc=Average current drawstrategy=averageunits=Areport_total=falsereport_maximum=truehistory_field_max_current:parameter=currentdesc=Maximum current drawstrategy=maximumunits=Ainit_tracker=truereport_total=falsereport_maximum=falseThis modification adds fields for current draw, power usage, and energy consumption, which will be recorded in the job history upon completion of a print job.
-
Apply the new configuration by restarting Moonraker
Restarting the Mooraker service sudo systemctl restart moonraker -
Verify data tracking in Mainsail
To confirm the successful integration of power meter measurements and Moonraker’s job history, access the Mainsail Web UI for your printer. If the configuration has been completed correctly, you should see additional columns in the Job History section, as depicted in the screenshot below:

Further Reading
Section titled “Further Reading”- Moonraker sensor configuration documentation
- Shelly web interface guide