Automating Z Offset Adjustments
Introduction
Section titled “Introduction”Printing with diverse filament materials often necessitates Z offset adjustments for optimal bed adhesion and first layer squish. Manually executing these adjustments for each print job be inefficient and errors prone. This guide provides a comprehensive solution, detailing how to configure your Slicer to automatically incorporate necessary Z offset adjustments for each print job. Additionally, we will cover the modification of the PRINT_END macro to ensure the Z offset is reset to its default value upon print job completion, streamlining your printing process.
Prerequisites
Section titled “Prerequisites”To utilize this guide, ensure you have the following:
- A 3D printer configured with Klipper firmware
- A compatible Slicer software that supports filament-specific start G-code, such as:
- PrusaSlicer
- SuperSlicer
- OrcaSlicer
- Enable “Advanced” settings in your Slicer software to access the necessary configuration options.
Modifying the PRINT_END Macro
Section titled “Modifying the PRINT_END Macro”The printer.cfg file should already contain a PRINT_END macro definition, as this is a standard configuration in Voron setups. If you require a template, refer to the callout section below. To modify the PRINT_END macro, append the following command to its end. If your macro utilizes the SAVE_GCODE_STATE and RESTORE_GCODE_STATE commands, ensure that the added command follows the RESTORE_GCODE_STATE command. This is crucial because RESTORE_GCODE_STATE also restores the saved G-code offset, which could result in incremental changes to the offset between print jobs, rather than resetting to the baseline offset.
SET_GCODE_OFFSET Z=0The SET_GCODE_OFFSET command effectively resets the positional offset on the Z-axis to zero, thereby ensuring that all subsequent G-Code commands will execute without any Z-axis offsets. This resets the baseline for Z-axis positioning, allowing subsequent print jobs to adjust from known starting point.
Configuring Filament Settings in Your Slicer
Section titled “Configuring Filament Settings in Your Slicer”This section uses PrusaSlicer as an example, but the process applies to other slicers as well.
Step 1: Access Custom G-Code
Section titled “Step 1: Access Custom G-Code”In your Slicer, navigate to Filament Settings and select the Custom G-code entry (highlighted in blue in the screenshot below).
Step 2: Add Start G-Code
Section titled “Step 2: Add Start G-Code”SET_GCODE_OFFSET Z_ADJUST=0.3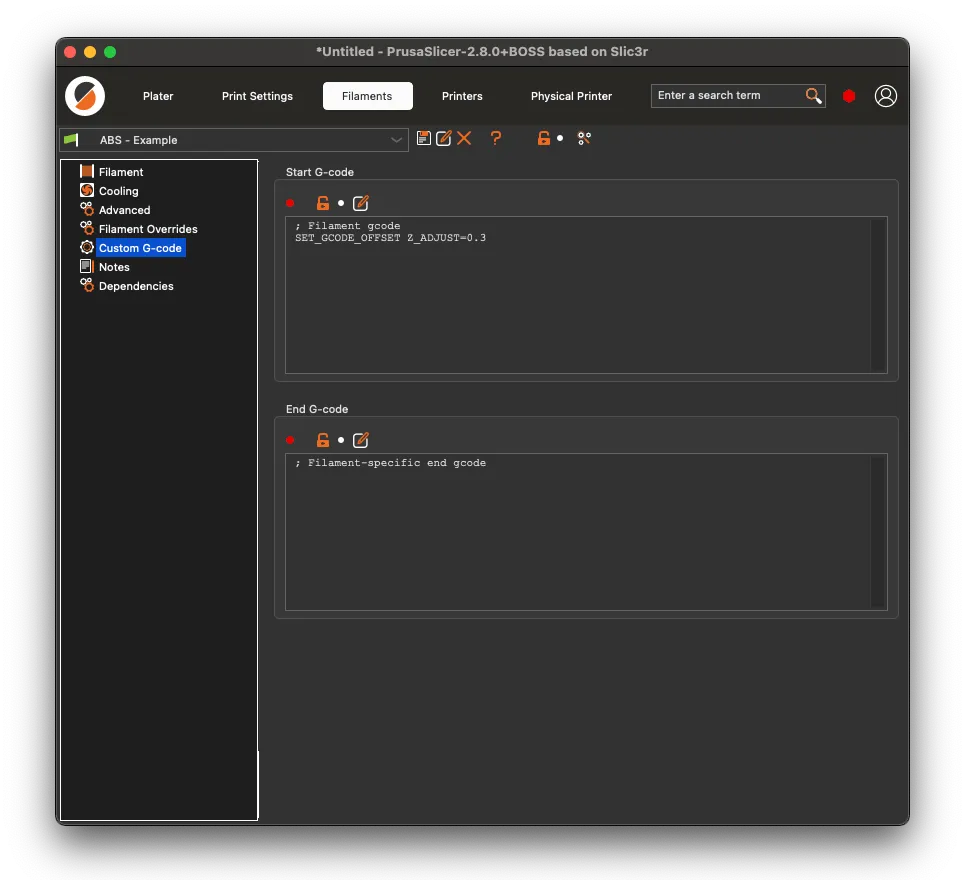
Note that the SET_GCODE_OFFSET command is utilized again, this time with the Z_ADJUST parameter, differing from the Z parameter used in the PRINT_END macro. The key distinction between these parameters is that Z sets the positional offset to the specified value, whereas Z_ADJUST modifies the existing offset by adding or subtracting the given value. For instance, executing SET_GCODE_OFFSET Z=-0.2 followed by SET_GCODE_OFFSET Z_ADJUST=0.3 results in a cumulative positional offset of 0.1 for the Z axis. This highlights the importance of resetting the offset post-print to maintain the correct Z offset.
Verification Process
Section titled “Verification Process”To confirm that the adjustments are being applied correctly, perform the following steps:
-
Slice and initiate a new print job.
-
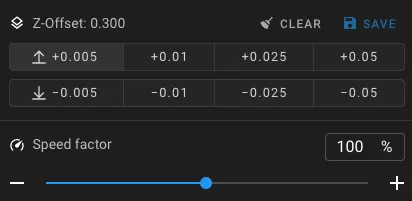
Observe the Z offset adjustment during the print job preparation phase. If the configuration is correct, the WebUI displays the desired Z offset in the Toolhead card, as shown in the screenshot below:
Further Reading
Section titled “Further Reading”- Klipper SET_GCODE_OFFSET documentation